
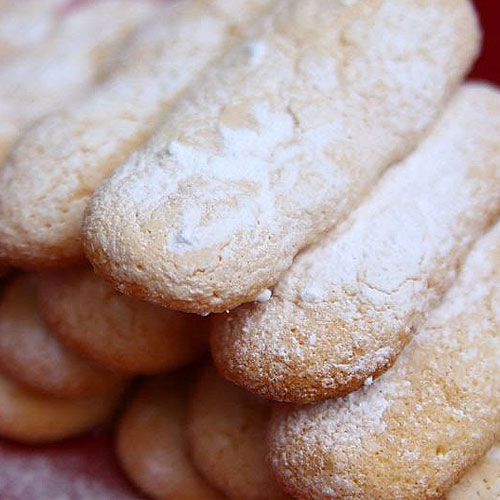
Ladyfingers (Savoiardi): Authentic Italian ladyfingers
Ladyfingers are light, airy cookies shaped like fingers, and they come with a royal backstory. Also known as Savoiardi, these sponge cookies date back to the 15th century. They were first made in the Duchy of Savoy, a region now split between France and Italy. Bakers created them to honor a visit from the King of France. The cookies quickly became a hit in royal courts across Europe.

The name Savoiardi comes from their birthplace. The recipe has barely changed since. Each cookie has a crisp outside and a soft, spongy center. Whipped egg whites give the batter its signature lightness.
Because they soak up flavor so well, ladyfingers work beautifully in layered desserts. You’ll find them in classics like tiramisu, charlottes, and trifles.
Dip them in coffee, layer with mascarpone, or use them as the base of a fruity treat they hold their shape while adding sweetness and structure.
Today, ladyfingers are everywhere from Italian bakeries to modern kitchens around the world. They’re simple, versatile, and just fancy enough to carry a bit of royal flair in every bite.
Traditional Ingredients
- Eggs (separated into yolks and whites)
- Granulated sugar
- All-purpose flour (sometimes “00” flour in Italy)
- Potato starch or cornstarch (optional, but common for a lighter texture)
- Vanilla extract or vanilla sugar (optional)
- Pinch of salt
- Powdered sugar (for dusting before baking)
Ingredients
Equipment
Instructions
- Prep the Oven & PansPreheat your oven to 375°F (190°C).Line two large baking sheets with parchment paper.Fill a piping bag with a large round tip (or use a zip-top bag with the corner snipped).
- Beat Egg YolksIn a large bowl, beat the egg yolks with ½ cup (100g) of the sugar until pale, thick, and creamy (about 4–5 minutes).Add vanilla extract if using. Set aside.
- Beat Egg WhitesIn a separate clean bowl, whip the egg whites with a pinch of salt until soft peaks form.Gradually add the remaining ¼ cup (50g) sugar and beat until stiff, glossy peaks form.
- Fold and CombineGently fold the whipped egg whites into the egg yolk mixture in three parts.Sift the flour over the mixture in batches and fold it in carefully to avoid deflating the batter.
- Pipe the CookiesTransfer the batter into your piping bag.Pipe 4-inch-long strips onto the parchment-lined trays, leaving about 1 inch of space between each.
- Dust with Powdered SugarLightly dust the piped cookies with powdered sugar.Let them sit for 5 minutes before baking. This helps develop that signature crisp top.
- BakeBake for 10–12 minutes, or until the tops are lightly golden and the cookies spring back when touched.If baking in batches, keep the remaining batter covered at room temperature.
- CoolLet cookies cool on the tray for 2 minutes. Transfer to a wire rack to cool completely.
Notes
Tried this recipe?
Let us know how it was!Ladyfingers (Savoiardi): Versatile Cookies for Tiramisu, Trifles, and More
Ladyfingers, or Savoiardi are surprisingly versatile cookies that do so much more than just play a role in tiramisu. Seriously, their light and airy texture is just begging to soak up all sorts of delicious flavors. That’s why they’re such a star player in desserts like trifles, charlottes, and those refreshing icebox cakes we all love.
You can really let your imagination run wild with them! Layer ladyfingers with creamy custard, toss in some fresh berries, or slather on fluffy whipped cream. You’ll whip up stunning no-bake desserts in just a few minutes. But if you’re in the mood for something a bit more put-together, they also make a fantastic, sweet base or lining for cheesecakes and mousse cakes. They add a nice touch of flavor and a bit of stability too.
In a rush? Just dip them in chocolate, throw them into parfait cups, or even sandwich them with Nutella or jam for a quick and easy treat. Whether you’re going for something elegant or just a simple sweet snack, ladyfingers have this lovely balance of gentle sweetness and that soft, melt-in-your-mouth texture that can elevate just about any dish.
Flavor Variations
Lemon Zest: Add a teaspoon of finely grated lemon zest to the yolks for a bright twist.
Almond Essence: Swap half the vanilla extract with almond extract for a more aromatic flavor.
Cocoa: Add 1–2 tablespoons of unsweetened cocoa powder to the flour for chocolate ladyfingers
Storage
Ladyfingers are best enjoyed fresh, but you can store them to keep that delicate texture intact. Keep them in an airtight container at room temperature, away from moisture, and they’ll stay crisp for up to a week.
You can freeze ladyfingers for up to 2 months without losing their light texture or flavor. Just layer them between parchment paper in an airtight container or freezer bag to prevent sticking and freezer burn. When you’re ready to use them, thaw at room temperature for about 30 minutes. Freezing is a great way to keep these delicate cookies fresh and ready for your next dessert project!


")

