
Pizzicati Cookies: A Beloved Italian Classic
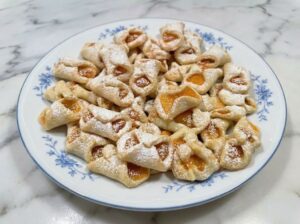
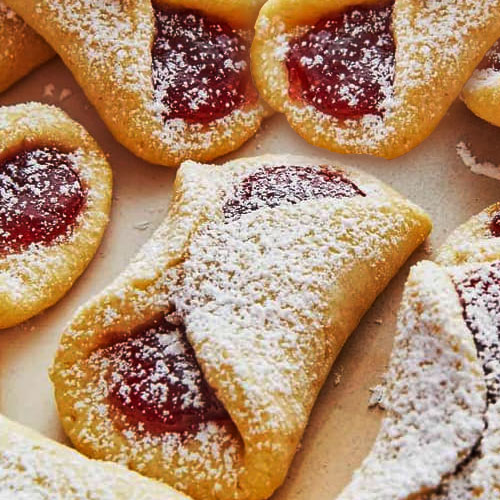
Let’s talk about Pizzicati cookies, those charming little Italian pinch cookies that are just, well, timeless. They hail from the heart of Central and Southern Italy, and the name “Pizzicati” means “pinched” in Italian. Each cookie is delicately pinched in the middle, creating this adorable peekaboo window that reveals the sweet filling inside. You’ll usually find them packed with fruit jam, luscious chocolate, or even sweetened ricotta. Honestly, every bite feels like a delightful surprise.
These cookies have been lovingly passed down over the years, mostly by our dear Nonna’s, those grandmas who just pour their hearts into everything they bake. They’ve become a go-to treat for holidays, Sunday family dinners, and those festive gatherings that really tug at your heartstrings. How simple they are. Just a handful of everyday ingredients like flour, sugar, and butter come together to make this buttery, tender cookie that practically melts in your mouth.
Even now, Pizzicati cookies are still capturing hearts, not just in Italy but all around the world. These traditional Italian cookies bring back that nostalgic taste of years ago. They remind us that sometimes, the simplest recipes can spark the most joy.
Typical ingredients for Pizzicati (Italian Pinch Cookies)
All-purpose flour
Butter – unsalted
Granulated Sugar
Eggs
Vanilla extract – for flavor
Salt
Powdered sugar – (dusting)
Almonds or almond paste(optional)
Lemon zest (optional)
Baking powder (optional)
Jam (apricot, raspberry, cherry, fig, etc.)
Nutella, chocolate spread, or sweetened ricotta (optional)
Pizzicati – Italian Pinch Cookies are crisp, buttery treats that melt in your mouth. Traditionally, they’re filled with your favorite jam, but a dollop of Nutella works beautifully too. Easy to make and irresistibly tasty, these cookies are perfect for a snack, teatime, or a sweet ending to any meal.
Ingredients
Instructions
- Make the Dough:In a large mixing bowl, combine flour, sugar, salt, and lemon zest (if using).Add the cold butter cubes and use your fingers or a pastry cutter to work the butter into the flour until the mixture resembles coarse crumbs.Add the egg and vanilla extract. Mix until a soft dough forms. Avoid overworking.Flatten dough into a disk, wrap in plastic wrap, and chill in the refrigerator for 30 minutes.
- Preheat the Oven:Preheat your oven to 350°F (175°C). Line two baking sheets with parchment paper.
- Shape the Cookies:Roll out the chilled dough on a lightly floured surface to about ⅛–¼ inch thickness. Cut into 2.5–3-inch (6–7 cm) squares or circles.Place about ½ teaspoon of filling in the center of each piece.Gently pinch the opposite sides of each cookie together in the middle to create the signature “pinched” look.
- Bake:Arrange cookies on the prepared baking sheets, spacing them about 1 inch apart.Bake for 12–15 minutes, or until the edges are lightly golden. Do not overbake—they should remain pale.
- Cool and Finish:Let the cookies cool completely on a wire rack. Dust with powdered sugar if desired.
Nutrition
Notes
Nutrition Facts (approximate values):
| Calories & Nutrition | Amount Per Cookie | % Daily Value |
|---|---|---|
| Calories | 80 kcal | — |
| Total Fat | 4.5 g | 6% |
| Saturated Fat | 2.5 g | 13% |
| Cholesterol | 20 mg | 7% |
| Sodium | 15 mg | 1% |
| Total Carbohydrates | 10 g | 4% |
| Dietary Fiber | 0.3 g | 1% |
| Sugars | 4 g | — |
| Protein | 1 g | 2% |
Tried this recipe?
Let us know how it was!Pizzicati Cookies Are the Perfect Italian Treat for Any Occasion
Honestly, with their melt-in-your-mouth goodness, that nostalgic smell wafting through your kitchen, and those pretty shapes, Pizzicati cookies are perfect for just about any occasion. Whether it’s a festive holiday gathering or a cozy afternoon tea, they fit right in. Their simplicity and classic Italian vibe make them a must-try for anyone who enjoys whipping up homemade treats that carry a bit of tradition. Grab your apron and give these delightful pinch cookies a try!
Some Flavor Variations
Jam Fillings:
Apricot Jam – Traditional and subtly sweet, pairs beautifully with lemon zest in the dough.
Raspberry or Cherry Jam – Adds a vibrant, tangy contrast to the buttery cookie base.
Fig Preserves – A rustic, old-world flavor that gives a rich and slightly chewy center.
Chocolate Fillings:
Nutella or Chocolate-Hazelnut Spread – A creamy, indulgent twist that kids and adults both love.
Chocolate Ganache – For a richer filling, use a cooled ganache made with dark chocolate and cream.
Ricotta Fillings:
Sweetened Ricotta with Vanilla & Orange Zest – Inspired by cannoli, this gives the cookies a creamy and aromatic center.
Ricotta with Mini Chocolate Chips – For a cookies-and-cream kind of flavor with Italian flair.
Nutty Fillings:
Almond Paste or Marzipan – Add a small dollop for a sweet, nutty center.
Pistachio Cream – A luxurious option that adds color and unique flavor.
Storage:
Room temperature: Store in an airtight container for up to 5–6 days.
Freezing: You can freeze the unbaked, shaped cookies (without powdered sugar) for up to a month. Bake from frozen—just add 1–2 extra minutes to the bake time.
Make-Ahead: The dough can be made 1–2 days ahead and kept refrigerated. Let it sit at room temperature for about 10 minutes before rolling if it’s too stiff.


 Recipe")
")