
Italian Wedding Cookies: Sweet Bites of Nostalgia
There’s something magical about Italian Wedding Cookies. Maybe it’s the buttery crumble, the way they melt in your mouth, or the snowy coat of powdered sugar that always ends up on your shirt.

But more than anything, these cookies carry stories of weddings, holidays, and generations gathered around the kitchen. Though they’re known by many names, snowballs, butterballs, or Russian tea cakes. These Sweet Bites have roots deep in Southern Italy, where almonds and walnuts are tucked into everything from cakes to pastries. As Italian families crossed oceans and planted new roots, they brought this humble, beloved cookie with them.
Over time, it became a fixture at celebrations here in America too, symbolizing sweetness, abundance, and the joy of being together.
They may be simple, just nuts, butter, flour, and sugar but there’s something timeless about them. Bake a batch, and you’re not just making cookies. You’re carrying on a tradition, one powdered-sugar fingerprint at a time.
Typical ingredients:
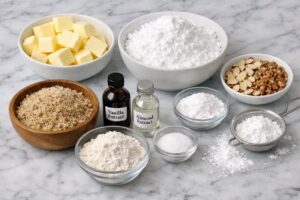
Unsalted butter (softened)
Powdered sugar
All-purpose flour
Ground nuts (almonds are traditional, pecans or walnuts are also common
Vanilla extract
Almond extract (optional but very traditional)
Salt
Finishing:
Powdered sugar
Ingredients
Equipment
Instructions
- Preheat oven to 350°F (175°C). Line a baking sheet with parchment paper.
- In a large mixing bowl, cream the softened butter and powdered sugar together until smooth and fluffy. You can use a hand mixer or mix by hand with a sturdy spoon.Add the vanilla extract and salt, mixing to combine.Gradually add the flour, mixing just until incorporated.Fold in the chopped nuts evenly through the dough.Optional: For easier handling and better texture, chill the dough in the fridge for about 30 minutes.
- Using your hands, roll the dough into 1-inch balls and place them about 2 inches apart on the prepared baking sheets.
- Bake for 15-18 minutes, or until the bottoms are lightly golden but the tops are still pale.
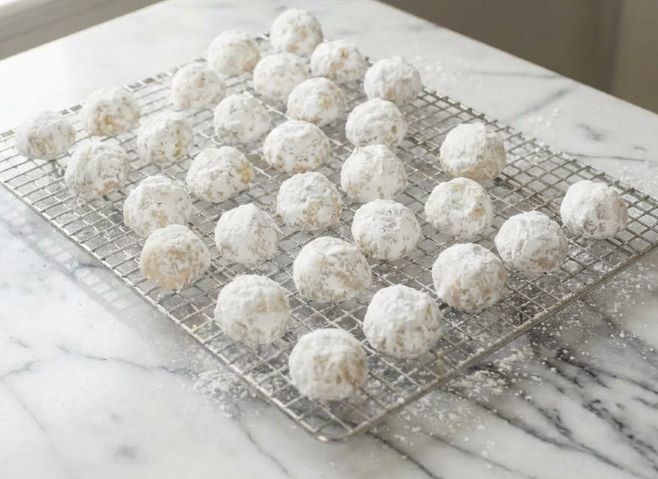
- Remove from the oven and allow the cookies to cool for 5 minutes on the baking sheet.While still warm, roll each cookie in powdered sugar. Place them on a cooling rack.
- Once completely cooled, gently roll the cookies in powdered sugar again for that classic snowy coating.
Notes
Nutrition Estimated Facts — Italian Wedding Cookies
(Serving size: 1 cookie (~20 g)
| Nutrient | Amount | %DV |
|---|---|---|
| Calories | 95 kcal | — |
| Total Fat | 6 g | 8% |
| Saturated Fat | 3.5 g | 18% |
| Cholesterol | 15 mg | 5% |
| Sodium | 35 mg | 2% |
| Total Carbohydrate | 9 g | 3% |
| Dietary Fiber | 0.6 g | 2% |
| Total Sugars | 4 g | — |
| Added Sugars | 3.5 g | 7% |
| Protein | 1.5 g | 3% |
| Calcium | 10 mg | 1% |
| Iron | 0.5 mg | 3% |
| Potassium | 45 mg | 1% |
Tried this recipe?
Let us know how it was!Wedding Cookies All Year Long!
Sure, they’re called wedding cookies, but don’t let that fancy name scare you off. These little powdered sugar-coated gems aren’t just for “I do” moments. They’re the kind of cookies that sneak into Christmas cookie tins, cozy up to your afternoon coffee, and crash bridal showers with a wink and a smile.
Italian Wedding Cookies are comfort in every crumb, a bite of nostalgia that makes any day feel a little more special. So go ahead, bake a batch anytime you want to sprinkle some sweetness on life.
Storage
Keeping Italian Wedding Cookies fresh is actually pretty simple, but a little TLC goes a long way.
Store them in an airtight container at room temperature, and they’ll stay soft and delicious for about a week. Want to keep the magic going longer? Pop them in the freezer! Just tuck the cookies in a sealed container or freezer bag, and they’ll happily wait for up to three months.
When you’re ready to enjoy, let them thaw at room temperature—if their signature powdered sugar coat looks a little faded, just roll them in a fresh dusting, and voilà! They’re good as new, ready to make your taste buds smile all over again.


 Recipe")

